Payment
The boilerplate integrates Stripe as its payment processor, providing ready-to-use implementations for both subscription-based payments and one-time purchases. It leverages Stripe Checkout to handle secure payment processing while requiring minimal setup from your end.
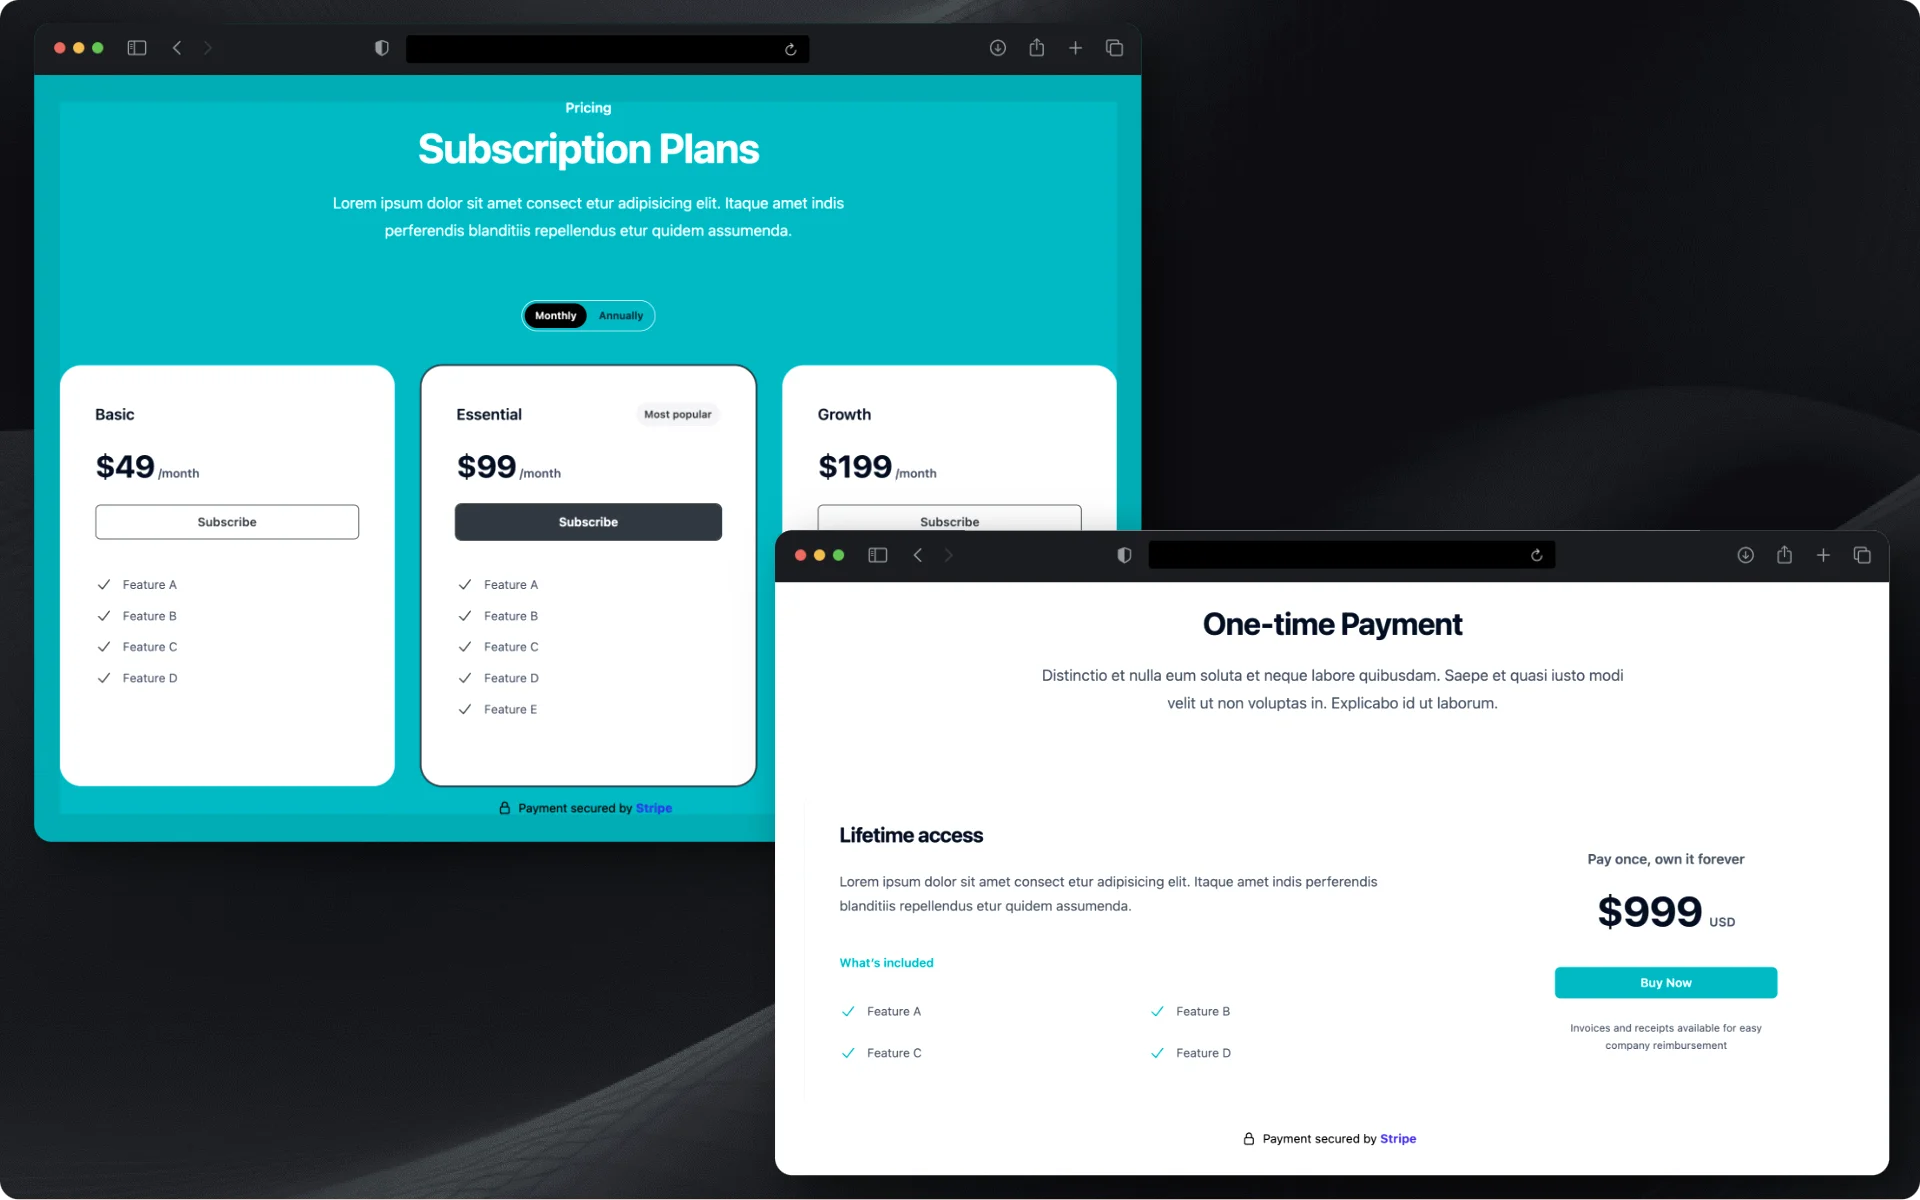
Pricing plans options
Homepage Pricing Display
Key files
All pricing-related templates are located in:
templates/
├── home.html                          # Main homepage template
├── partials/
│   ├── home_pricing_single.html       # One-time payment layout
│   └── home_pricing_three_tiers_block.html  # Subscription plans layout
The homepage supports flexible pricing display options to accommodate different business models. You can easily switch between subscription plans and one-time purchase layouts through template configuration.
# templates > home.html
{% block custom_content %}
    {% include "partials/home_pricing_single.html" %}
    {% include "partials/home_pricing_three_tiers_block.html" %}
{% endblock %}
Simply (un)comment your preferred pricing component in templates/home.html to match your business model
One-time payment display
If you want to offer a single purchase option:
1. Enable in templates/home.html:
{% block custom_content %}
    {% include "partials/home_pricing_single.html" %}
    {# {% include "partials/home_pricing_three_tiers_block.html" %} #}
{% endblock %}
2. Customization options:
- Edit
home_pricing_single.htmlto modify product details like name, price, feature list, and purchase button appearance. The template manages all pricing elements through direct HTML editing with Tailwind CSS styling, requiring no admin configuration.
Subscription plans display
For recurring subscription offerings:
1. Enable in templates/home.html:
{% block custom_content %}
    {# {% include "partials/home_pricing_single.html" %} #}
    {% include "partials/home_pricing_three_tiers_block.html" %}
{% endblock %}
2. Navigate to the admin panel to set up your subscription plans
- For each plan, you can specify the monthly and annual pricing, feature list, and set a "most popular" flag for highlighting
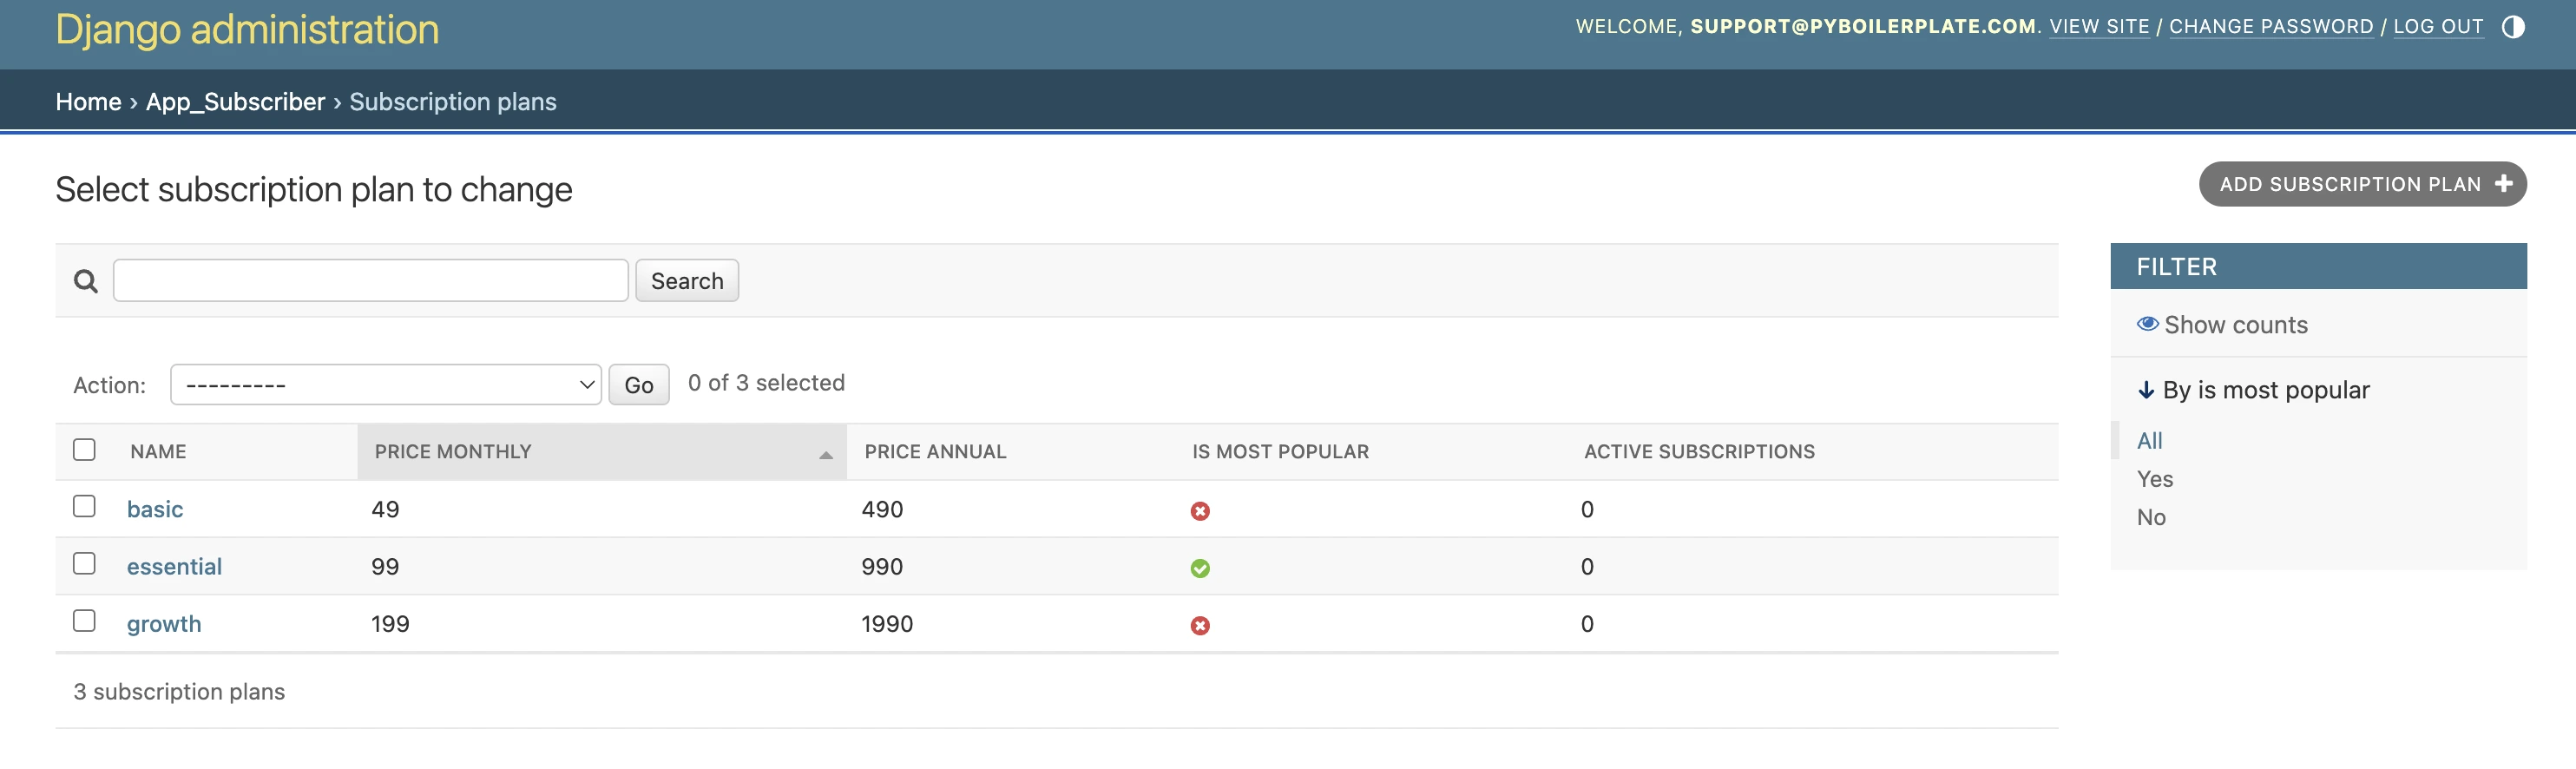
Subscription Plans Admin Configuration
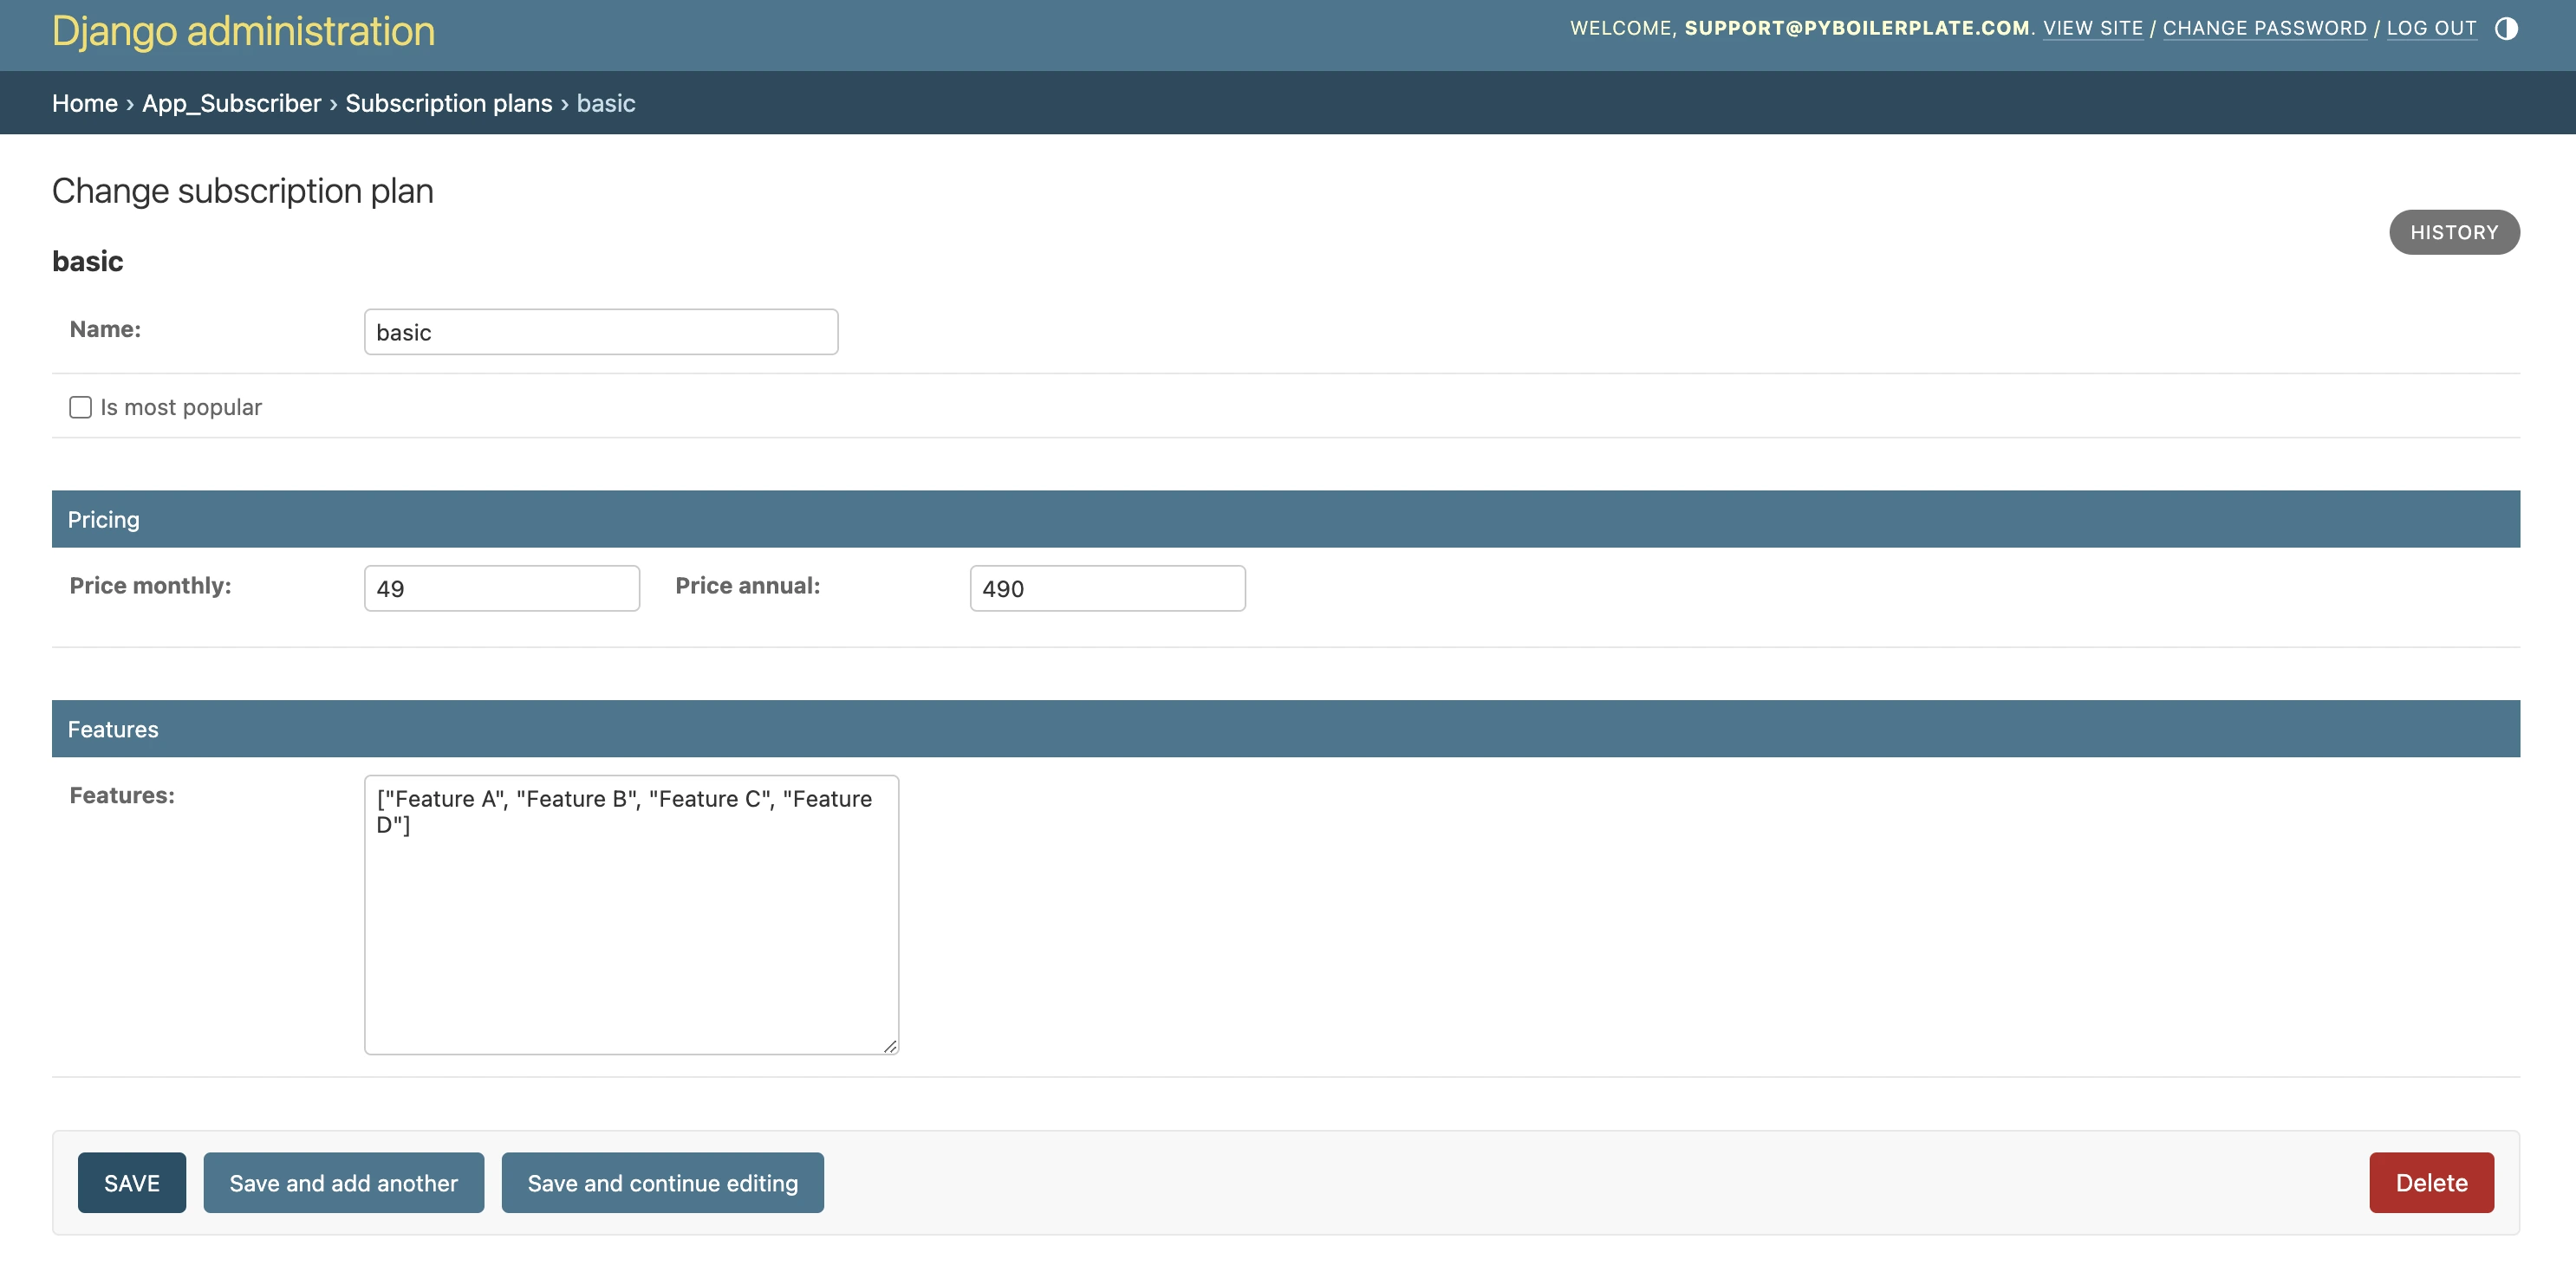
Subscription Plans Admin Detail Configuration
Stripe Account
To enable payments, you'll need a Stripe account and API keys. Visit Stripe's registration page to create an account.
Once registered, you'll have access to two environments in your Stripe Dashboard under Developers > API keys:
- Production (PROD): For processing real transactions in your live application
- Development (DEV): For testing payments in your development environment
Add both sets of keys to your .env file:
# ------------------------------------------- PROD STRIPE ----------------------------------------------------
# Use these keys only in production - they will process actual payments
STRIPE_SECRET=sk_live_... # Your live secret key
STRIPE_PUBLIC=pk_live_... # Your live publishable key

# ------------------------------------------- DEV STRIPE -----------------------------------------------------
# Use these keys for development and testing - they won't process real payments
STRIPE_SECRET_DEV=sk_test_... # Your test secret key
STRIPE_PUBLIC_DEV=pk_test_... # Your test publishable key
- Development keys (prefixed with
sk_test_andpk_test_) are for testing and won't process real payments - Production keys (prefixed with
sk_live_andpk_live_) will process actual financial transactions - Never commit your API keys to version control
- The boilerplate automatically uses the appropriate keys based on your
DEV_MODEsetting:- When
DEV_MODE=True: Uses development keys - When
DEV_MODE=False: Uses production keys
- When
One-time Purchase
The one-time purchase system orchestrates a seamless flow between Stripe payments and user access management. When payments are processed through Stripe, the system handles two distinct scenarios:
- For new customers, upon successful payment, the system automatically creates a user account, sets
has_access=True, and triggers a welcome email containing password setup instructions. - For existing customers, successful payments result in an order confirmation email and their account being updated with
has_access=True. - The
has_accessflag serves as the central control mechanism, determining whether users can access premium features and pages throughout the application. - This streamlined process ensures immediate access to features post-payment, with the backend handling all user management tasks and email communications automatically.
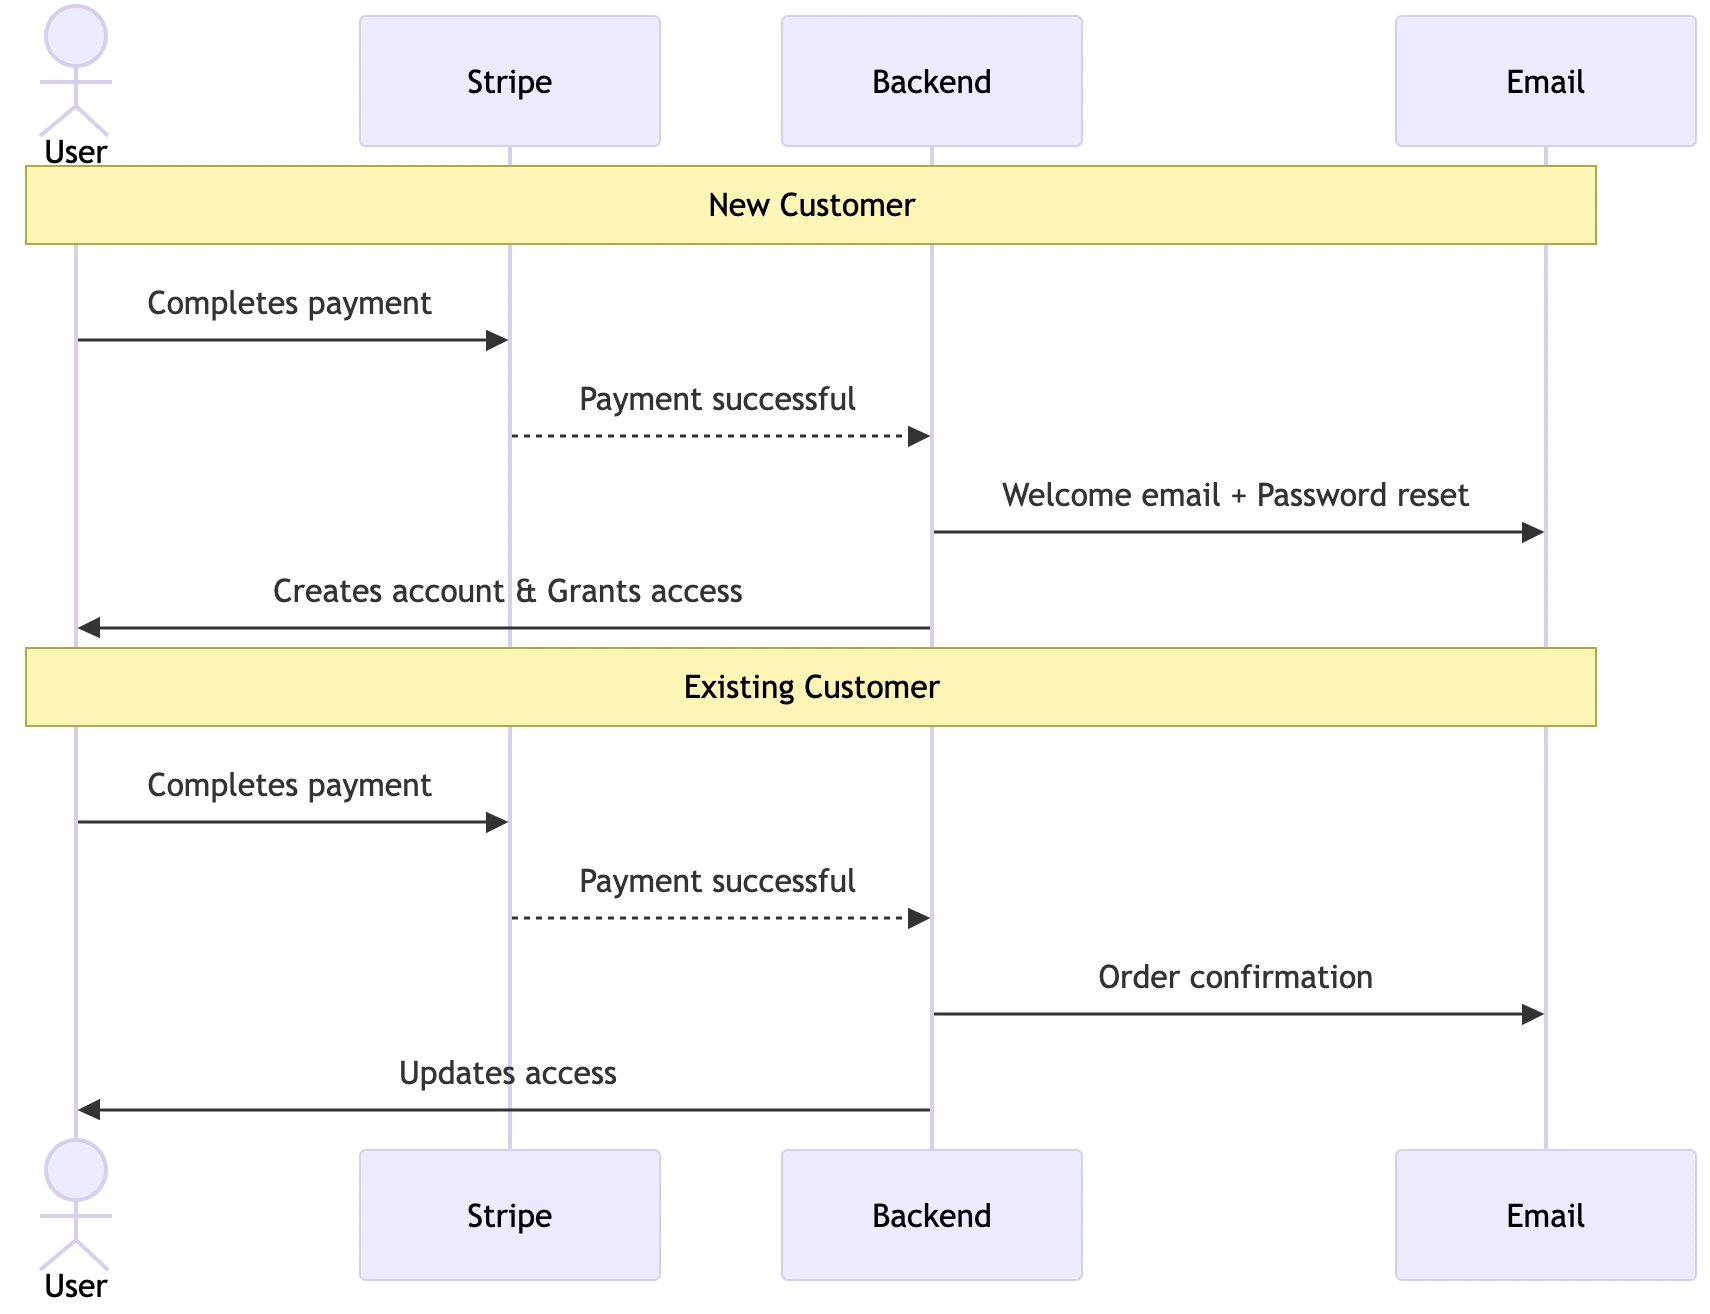
One time purchase payment flow
Setup product in Stripe
1. Navigate to your Stripe Dashboard
- Switch to test mode for development setup
- Stay in live mode for production setup
2. Create a new product
- Click "Add Product", set name and description
- Choose "One-time" pricing and set your price/currency
3. Get your price ID
- Locate the Price ID (starts with "price_")
- Add it to your environment variables:
# ------------------------------------------- PROD STRIPE ----------------------------------------------------
# ----------------------------------------- ONE-TIME PAYMENT -------------------------------------------------
PRODUCT_ONE_TIME_PAYMENT_ID=price_xxx

# ------------------------------------------- DEV STRIPE -----------------------------------------------------
# ----------------------------------------- ONE-TIME PAYMENT -------------------------------------------------
PRODUCT_ONE_TIME_PAYMENT_DEV_ID=price_yyy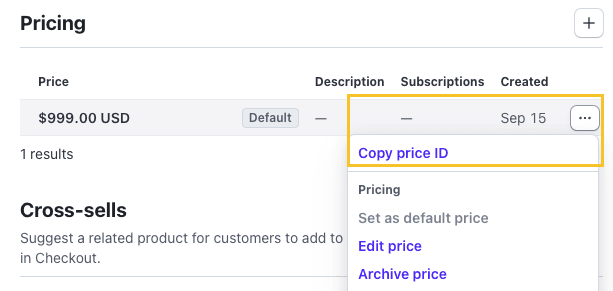
Stripe Price ID location
Implementation files
The one-time purchase implementation using Stripe Checkout follows a structured payment flow. When a customer initiates a purchase, the system creates an order record, processes the payment through Stripe, and updates the user's access upon successful completion. Here's how the implementation is organized:
app_customer/
├── models.py          # Order model for tracking purchases
│   └── class Order   # Stores purchase status and details
├── views.py          # Payment processing logic
│   ├── checkout()    # Creates Stripe checkout session
│   └── checkout_success()  # Handles successful payments
├── urls.py           # Payment flow routing
├── admin.py          # Django admin interface customization
└── templates/
    └── account_orders.html  # Order details display
Each component plays a specific role in the payment process:
- Models store essential order information including status, payment details, and customer data
- Views handle the payment flow, from initiating the Stripe checkout session to processing successful payments
- Templates provide the user interface for order management and status tracking
- URL patterns define the routing for the entire payment flow
- Admin interface enables staff to monitor and manage orders efficiently
Stripe Checkout Guide : Complete integration guide for implementing Stripe Checkout
Stripe Checkout Session Events : Complete reference for checkout session properties, events and payment flow
Stripe Payment Intent Events : Comprehensive guide to all payment intent events and their typical use cases
Subscription Plans
PyBoilerplate starter kit implements a straightforward subscription system using Stripe. When subscription requests are processed, the system handles distinct scenarios:
- For users with an active subscription attempting to subscribe again, the system displays an informative message indicating they already have an active subscription and redirects them to their subscription management page, preventing duplicate subscriptions.
- For new customers, upon successful subscription, the system automatically creates a user account, sets
has_access=True, and triggers a welcome email containing password setup instructions. - For existing customers without an active subscription, successful subscription activation results in an order confirmation email and their account being updated with
has_access=True. - The
has_accessflag serves as the central control mechanism, determining whether users can access premium features and pages throughout the application.
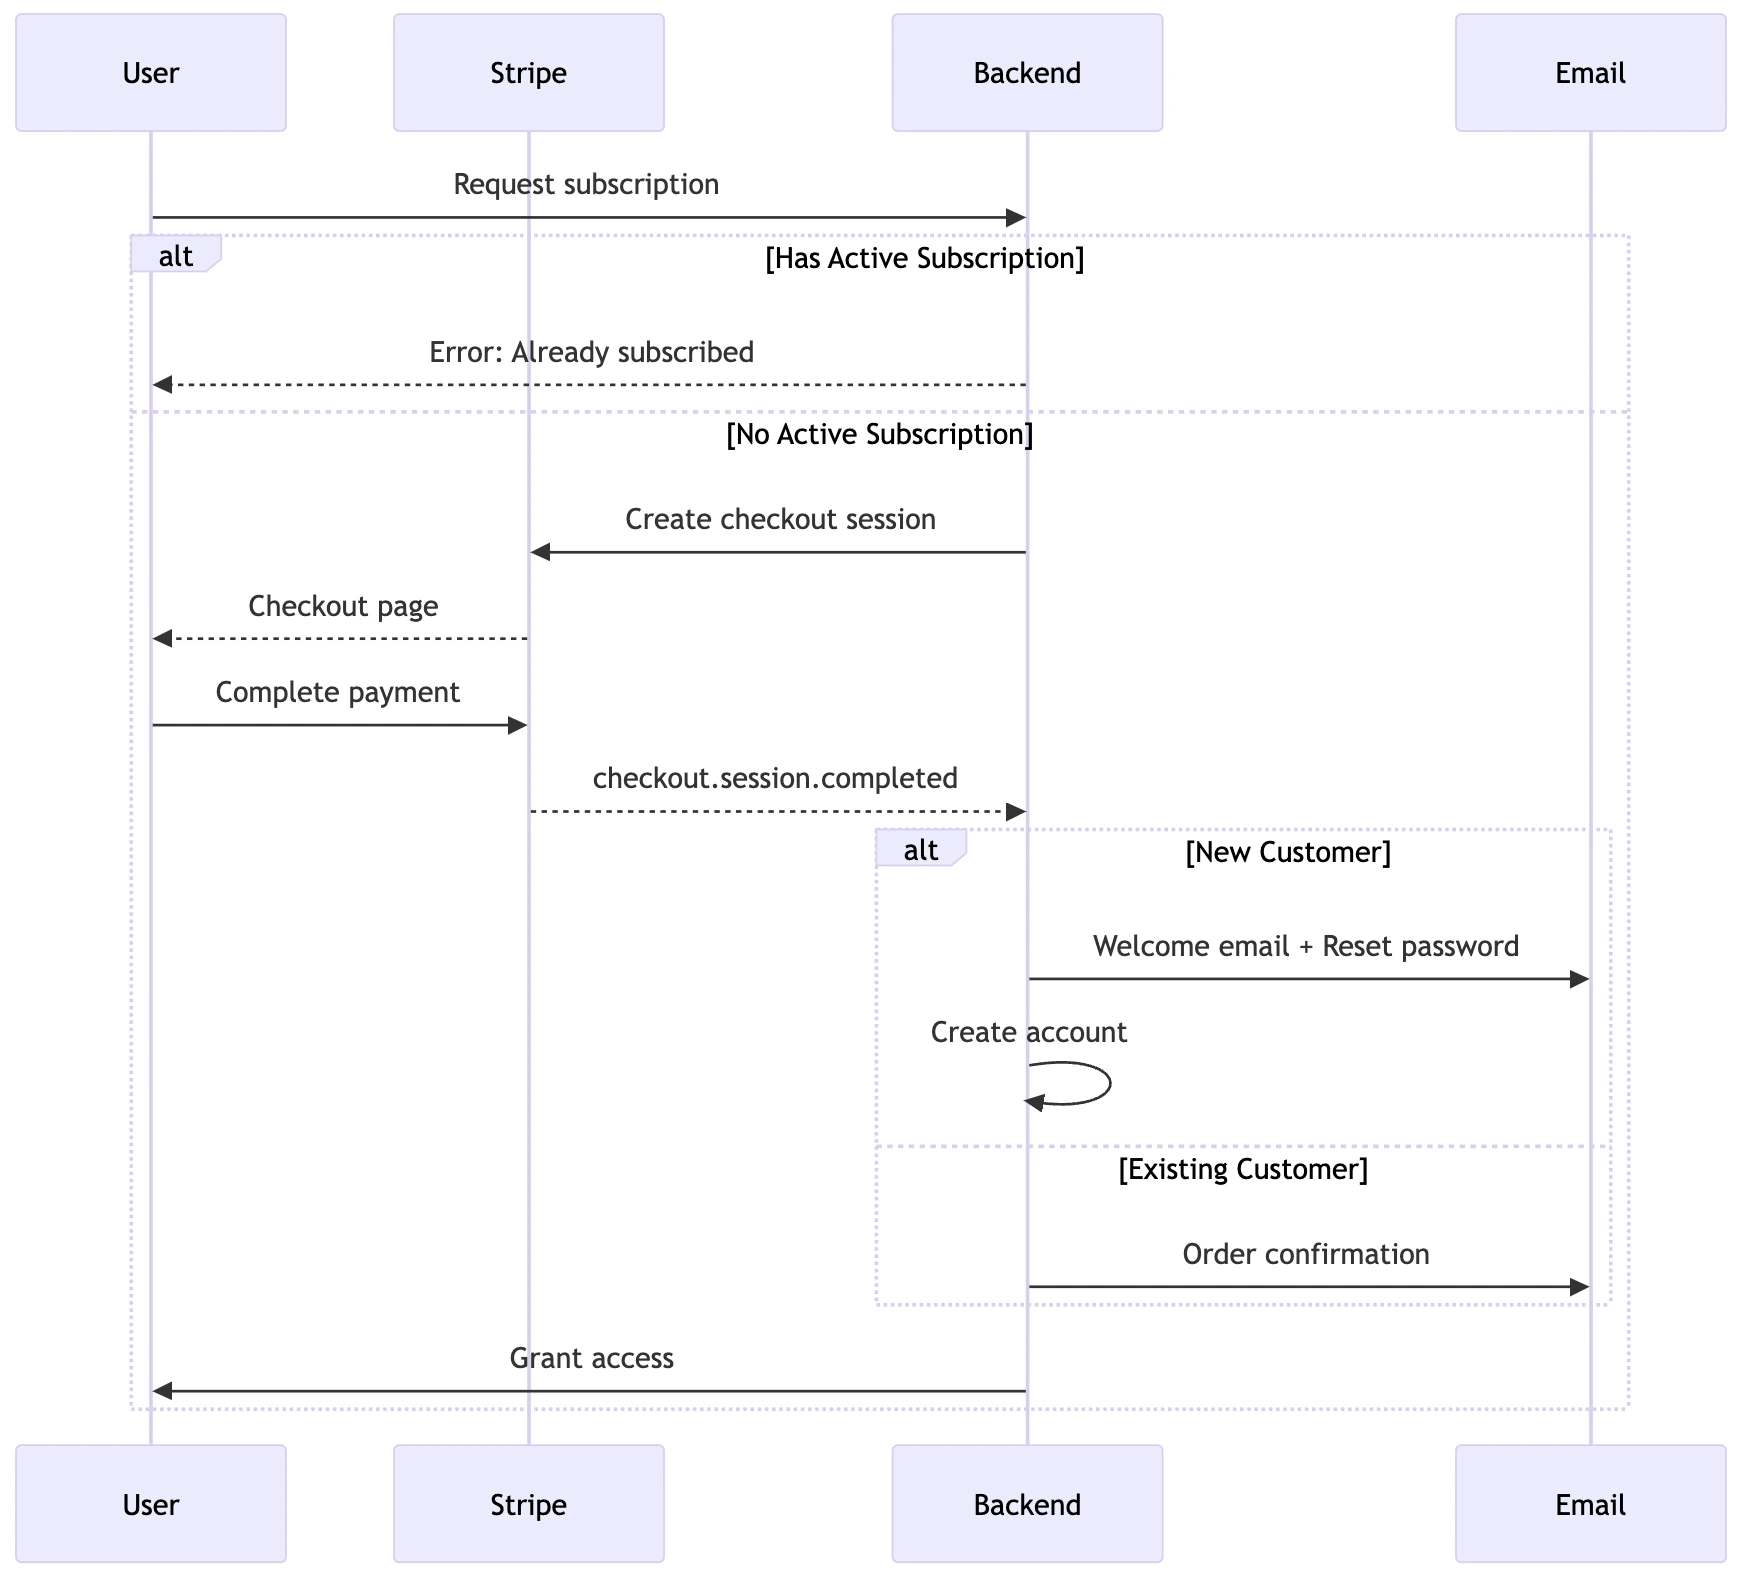
Subscription plan payment flow
Throughout the subscription lifecycle, the boilerplate manages various events including payment processing, subscription updates, and cancellations, ensuring a seamless experience for both new and existing customers while maintaining proper access control.
Setup subscription plans in Stripe
1. Navigate to your Stripe Dashboard
- Switch to test mode for development setup
- Stay in live mode for production setup
2. Create new products
- Click "Add Product", set name and description
- Choose "Recurring" pricing and set your price/currency
3. Get your price ID
- Locate the Price ID (starts with "price_")
- Add it to your environment variables:
# ------------------------------------------- PROD STRIPE ----------------------------------------------------
# ------------------------------------------- SUBSCRIPTIONS --------------------------------------------------
PRODUCT_BASIC_SUBSCRIPTION_ID=price_xxx
PRODUCT_BASIC_SUBSCRIPTION_ANNUAL_ID=price_xxx
PRODUCT_ESSENTIAL_SUBSCRIPTION_ID=price_xxx
PRODUCT_ESSENTIAL_SUBSCRIPTION_ANNUAL_ID=price_xxx
PRODUCT_GROWTH_SUBSCRIPTION_ID=price_xxx
PRODUCT_GROWTH_SUBSCRIPTION_ANNUAL_ID=price_xxx

# ------------------------------------------- DEV STRIPE -----------------------------------------------------
# ------------------------------------------- SUBSCRIPTIONS --------------------------------------------------
PRODUCT_BASIC_SUBSCRIPTION_DEV_ID=price_yyy
PRODUCT_BASIC_SUBSCRIPTION_ANNUAL_DEV_ID=price_yyy
PRODUCT_ESSENTIAL_SUBSCRIPTION_DEV_ID=price_yyy
PRODUCT_ESSENTIAL_SUBSCRIPTION_ANNUAL_DEV_ID=price_yyy
PRODUCT_GROWTH_SUBSCRIPTION_DEV_ID=price_yyy
PRODUCT_GROWTH_SUBSCRIPTION_ANNUAL_DEV_ID=price_yyy
Implementation files
The subscription flow is organized across the following files:
app_subscriber/
├── models.py
│   ├── SubscriptionPlan      # Plan configuration and pricing
│   ├── Subscription         # Active subscriptions tracking
│   └── SubscriptionInvoice  # Invoice history
├── views.py
│   ├── checkout_subscription()        # Initiates subscription checkout
│   ├── checkout_success_subscription()  # Handles successful subscription
├── urls.py            # Subscription routing
└── admin.py           # Subscription admin interface
templates/
├── account_profile.html     # Profile details display
├── account_subscriptions.html     # Subscription management
└── emails_custom/                        # Email notifications
    ├── welcome_email_signup.html
    ├── welcome_email_with_password_setup.html
    └── subscription_confirmation_email.html
Each component serves a specific purpose:
- Models
SubscriptionPlan: Stores plan details including pricing, features, and limitationsSubscription: Tracks active subscriptions with status, plan type, and renewal datesSubscriptionInvoice: Records invoice history for subscriptions
- Views
checkout_subscription(): Creates subscription checkout sessionscheckout_success_subscription(): Handles successful subscription creation and user access
- Templates
account_profile.html: User profile management interfaceaccount_subscriptions.html: Subscription management interface- Email templates in
emails_custom/:welcome_email_signup.html: New user signup notificationswelcome_email_with_password_setup.html: Account setup instructionssubscription_confirmation_email.html: Subscription confirmation notifications
- URLs
- Routes for subscription creation, management, and webhook endpoints
- Admin Interface
- Custom admin views for subscription plan management
- Filtering and search capabilities for subscriptions and invoices
- Detailed views for tracking subscription metrics and status
Stripe Subscription Docs: Official guide for implementing recurring billing and subscription management with Stripe.
Subscription Lifecycle
Subscriptions Lifecycle Events
The subscription lifecycle management system handles various subscription states and events through Stripe's webhook notifications. When Stripe sends subscription status updates, the system automatically processes three critical scenarios:
- For general subscription updates, the backend synchronizes the subscription status to maintain accurate records.
- In the case of payment failures, the system automatically sends payment reminder emails and restricts user access until payment is recovered. Upon successful payment recovery, user access is automatically restored.
- When subscriptions are cancelled, the system processes the deletion event by sending a cancellation confirmation email and removing the user's access to premium features.
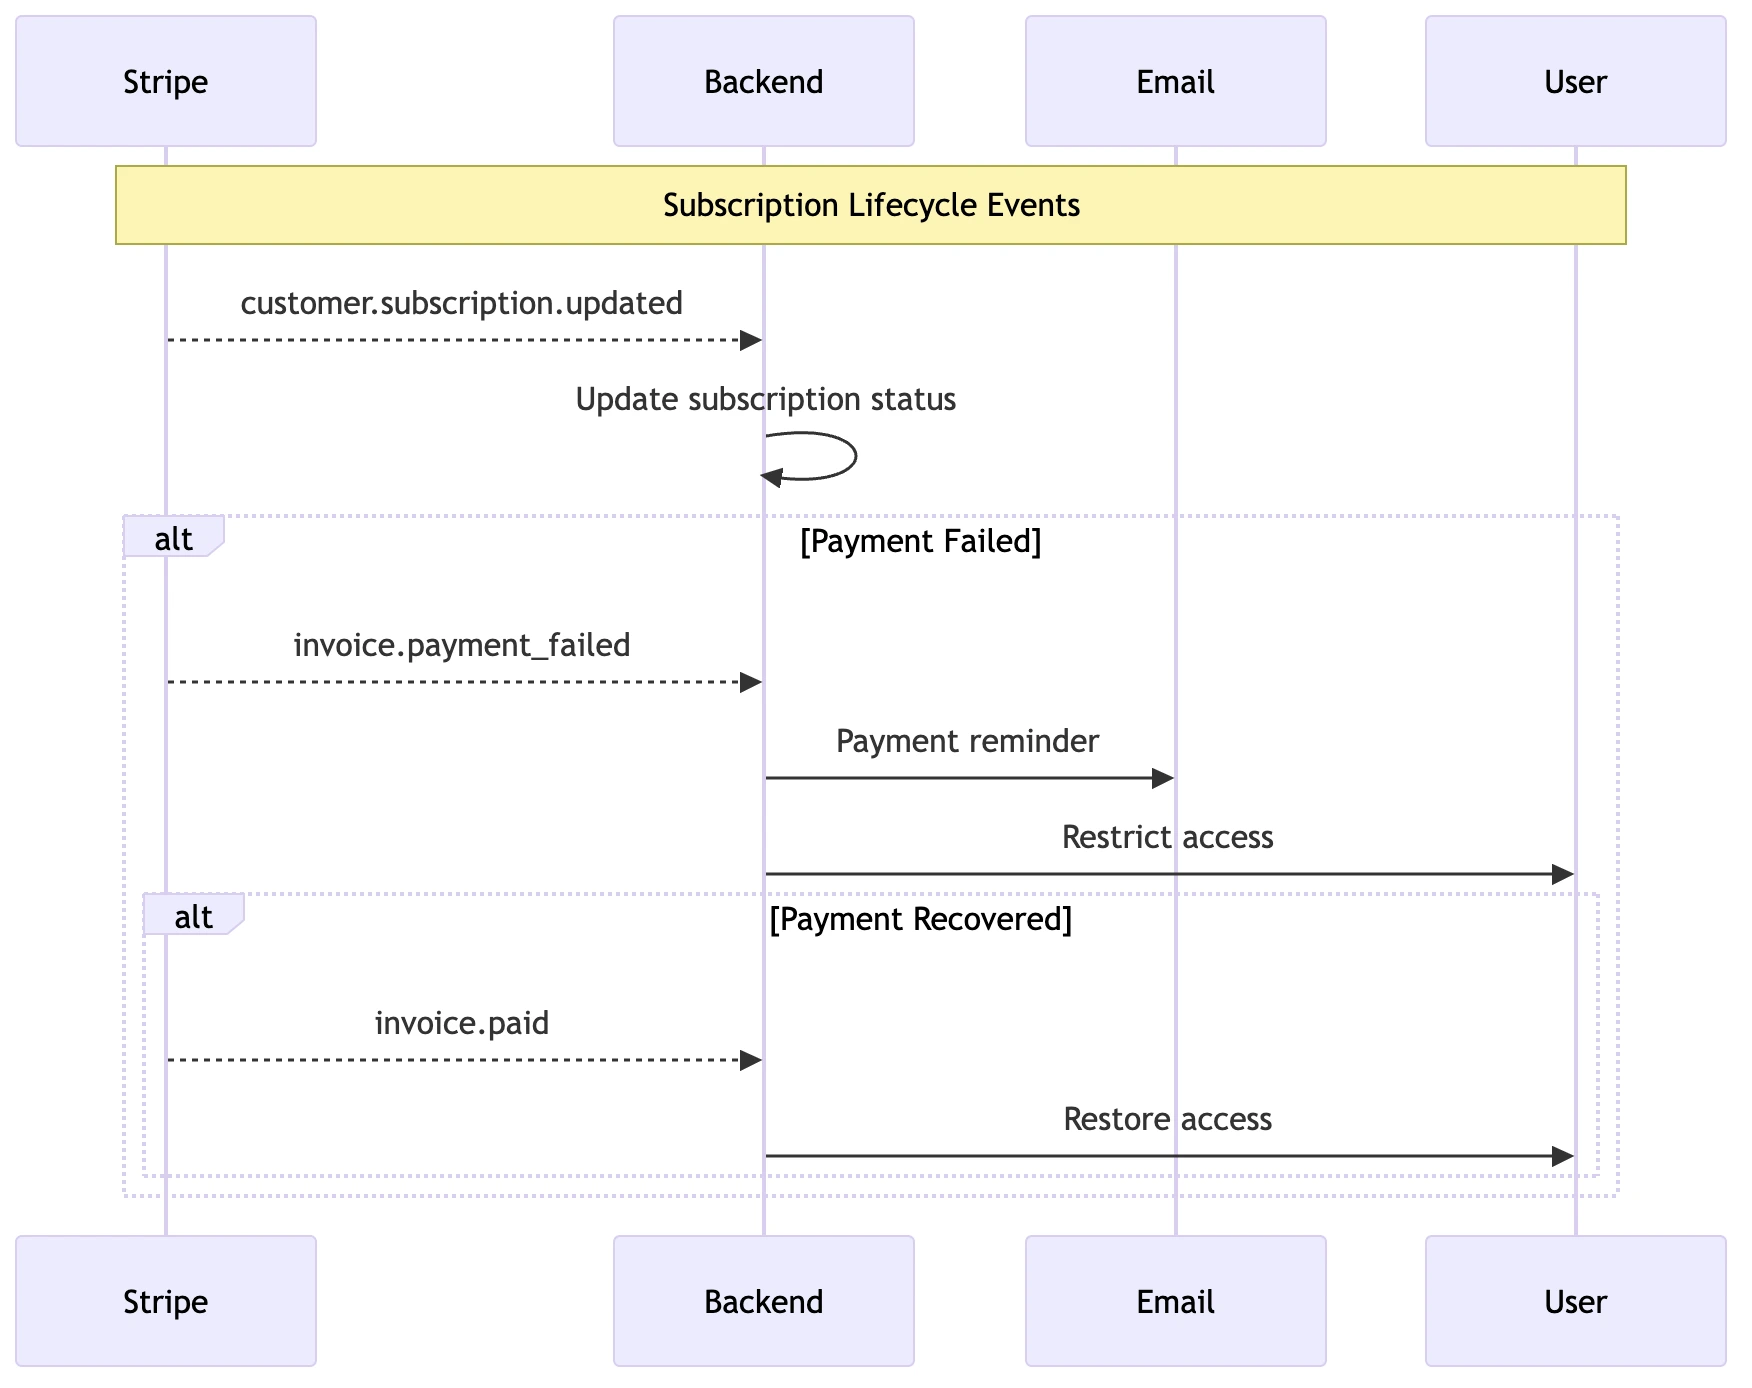
Subscription Lifecycle Events
Configure Stripe Webhooks
Webhooks are crucial for managing subscription lifecycles as they allow your application to respond to events that happen in Stripe, such as successful payments, failed payments, cancellations, and upgrades.
1. Modify webhook URL path in saas/urls.py
The default webhook path webhooks/stripe/ should be changed before deployment for security:
# saas/urls.py
urlpatterns = [

    # Example of a more secure webhook path
    path('your-custom-path/wh-95c70014abd2a0e/', stripe_webhook, name='stripe_webhook'),

]
2. Configure Webhook Endpoint in Stripe
- Go to Stripe Dashboard > Developers > Webhooks
- Add endpoint URL:
https://your-domain.com/stripe/webhook/ - Select events to listen to:
customer.subscription.updatedinvoice.payment_failedinvoice.paid
3. Add webhook secret to environment variables in .env
Reveal the signing secret in Stripe Webhook Dashboard and update .env:
STRIPE_WEBHOOK_SECRET=whsec_your_webhook_signing_secret
Debug Stripe Webhooks
1. Install Stripe CLI
brew install stripe/stripe-cli/stripe
# Or download from https://stripe.com/docs/stripe-cli
2. Login and listen to webhooks
stripe login
stripe listen --forward-to localhost:8000/webhooks/stripe/
3. Test webhook events
stripe trigger customer.subscription.updated
stripe trigger invoice.paid
stripe trigger invoice.payment_failed
4. Monitor webhook traffic
- Check your terminal running
stripe listenfor request/response details - Review Django logs for webhook processing
- Use Stripe Dashboard > Developers > Webhooks > Recent events
Implementation files
The Stripe webhook is organized across the following files:
app_subscriber/
├── views.py
│   └── stripe_webhook()              # Processes Stripe webhooks
saas/
├── urls.py           # Main URL configuration including webhook endpoint
│   └── stripe_webhook()  # Webhook endpoint routing to app_subscriber view
Stripe Webhooks Guide: Essential documentation for handling subscription lifecycle events.
Stripe Subscription Object: Complete reference for subscription properties and statuses.
Stripe List of Events: Comprehensive guide to all webhook events and their payloads.
Manage Customer Billing
Stripe Customer Portal Setup
The Stripe Customer Portal offers a secure, pre-built interface that streamlines billing management for your customers. Through this portal, customers gain complete control over their billing experience, enabling them to review their transaction history, access and download past invoices, update their payment information, and manage their subscription preferences. This self-service approach reduces support overhead while providing customers with a professional, branded billing management experience.
1. Configure Stripe Customer Portal
- Navigate to your Stripe Dashboard
- Click on "Settings" → "Billing" → "Customer Portal"
- Configure the following settings (business info, branding, ...)
2. Update .env
# ------------------------------------------ CUSTOMER PORTAL -------------------------------------------------
STRIPE_CUSTOMER_PORTAL_URL=https://your-stripe-customer-portal.com
STRIPE_CUSTOMER_PORTAL_URL_DEV=https://your-stripe-customer-portal.com
Stripe Customer Portal : Guide for implementing self-service subscription and billing management
PyBoilerplate provides pre-configured templates for both one-time purchases and subscription payments. However, each project requires specific customization:
Key Decisions:
- Choose which payment model(s) to implement (one-time, subscription, or both)
- Define how authentication integrates with payments:
- Will users be able to register without paying? (freemium vs. paid-only)
- What features are accessible before payment?
- How will access be managed after payment?
Adapt the provided payment flows and user management logic to match your specific business requirements while maintaining secure payment handling.